Photography in One
A Brief History of Photography, Basic Photographic Theory, Principles and Techniques
![]()
![]()
| Introduction |
| A Brief History of Photography (in preparation) |
| Classic Photographs |
| Basic Photography Theory, Principles and Technique |
Photography has been with us for nearly two hundred years. From its discovery in the early 1800s up until the late 1980s, capturing the photographic image has been reliant on light sensitive metal elements (usually Silver Halide) coated onto a glass, celluloid or Mylar base materials and then chemically treated to develop or amplify the image and make it permanent.
Since the late 1980s there has been a revolution taking place that changed how the image is captured. This was the digital photographic revolution. Whereas previously, images were captured and processed using precious metals and chemistry, advances in electronics have led to photographic image capture becoming more and more reliant on digital electronics. This in turn has led to cameras being less expensive, more versatile and compact with the processing of the resulting images being more convenient, safer and more environmentally friendly.
“Photography in One” is an introduction to the history, basic theory, principles and technique of both traditional analogue (silver based or wet) and digital photography. Regardless of how the image is recorded whether it be on a traditional silver-based (analogue) film camera or a modern digital camera certain principles and techniques are relevant to both forms of photography. In some instances it is easier to understand how these principles work using analogue photography so please do not be daunted by the inclusion of these aspects of the subject even though you might not think them to be relevant at first.
Cyril J Wood
November 2015
A Brief History of Photography (in preparation)
Photography as we know it today is the combining of various technologies from different points in time. Its beginnings are firmly rooted in the camera obscura... a device or darkened room where an inverted (upside down) image was projected onto a sheet of canvas or paper attached to the inside wall for artists to paint or sketch. The camera obscura dates from about 400bc when the Chinese philosopher Mozi commented on the way that the image was inverted and laid down the first minor laws of optics. In subsequent centuries these laws were further studied to develop the knowledge of how light behaves in various circumstances.
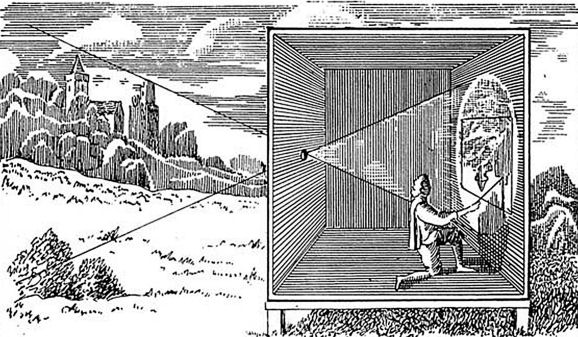
Principle of the Camera Obscura
One of the most famous artists to use the camera obscura was Giovanni Antonio Canal better known as Canaletto. The use of the device was paramount in producing the near perfect perspective that is a major feature of his paintings of Venice, London, Rome and other European locations.

Observe the perfect perspective in this painting of St Mark's Square, Venice by Canaletto
The camera lucida was a nineteenth century development of the camera obscura that was more portable and better suited to the landscape painters of the time. Whilst on honeymoon in Italy in 1833, the photographic pioneer William Henry Fox Talbot (more of whom later) used a camera lucida as a sketching aid. He later wrote that he was disappointed with the results which encouraged him to develop a means to "cause these natural images to imprint themselves durably". In other words... he wanted to capture what he saw accurately and in a way that did not rely on artistic endeavours, was convenient and was permanent.
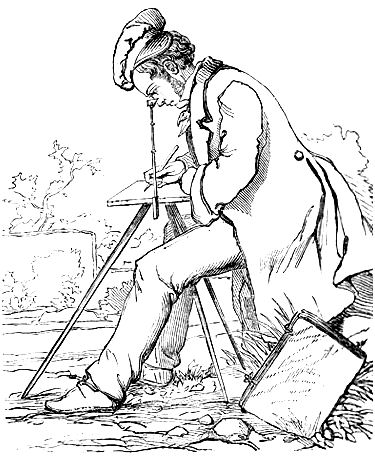
Camera Lucida in use
There had been many observations regarding the light sensitive properties of silver but it was the Italian physicist and chemist Angelo Sala who noted in the early seventeenth century that powdered silver nitrate would darken when exposed to sunlight but he did not find any practical application for the phenomenon. Around 1800 the potter Thomas Wedgwood had noticed that light had the ability to darken paper and leather treated with silver nitrate but his efforts to stabilize or "fix" the image were fruitless and images had to be stored in a lightproof box or room to prevent further darkening caused by the further darkening action of light. The images that he captured he called "Sun Prints".
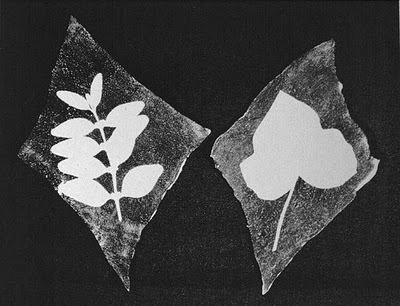
An example of a Wedgwood "Sun Print"
Fast forward to 1826 and the French inventor Nicéphore Niépcé was experimenting with a means of capturing imaged using Bitumen of Judea coated onto copper plates used for lithographic etchings. The coated plates were loaded into a camera obscura and on exposure the light, which could be up to eight hours, caused a hardening of the bitumen in the parts of the image that were exposed to the greatest intensity of light. After the exposure the plate was bathed in and oil of lavender and turpentine mixture to dissolve the unhardened bitumen which resulted in a photographic relief image. After drying the plate was inked and contact printed onto paper to produce what was the first true photographic based lithographic printing process. Niépcé christened his process Heliography.
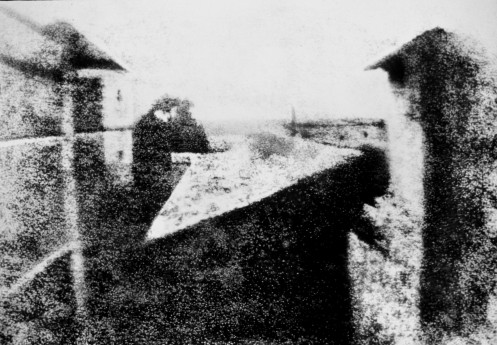
View from the Window at Le Gras - Generally accepted as the earliest surviving photographic image - Nicéphore Niépcé - 1826
In 1829, Niépcé entered into a partnership with Louis Daguerre, who was also seeking a means of creating permanent photographic images with a camera. They were introduced by Chevalier... the optician who supplied both of them with lenses for their camera obscurers. Together, they developed the physautotype, an improved process that used lavender oil distillate as the photosensitive substance. The partnership lasted until Niépcé's death in 1833, after which Daguerre continued to experiment, eventually working out a process that only superficially resembled Niépcé's. It consisted of a sheet of silver-plated copper polished to a mirror-like finish; treated it with fumes that made its surface light-sensitive; placed in a small camera obscura and exposed to light. This could be for varying lengths of time which could be as little as a few seconds for brightly sunlit subjects or much longer with less intense light. After exposure he made the resulting latent image visible by fuming it with mercury vapour; removed its sensitivity to light by liquid chemical treatment; rinsed and dried it; then sealed the easily marred result behind glass in a protective enclosure. The resulting image will appear either positive or negative, depending on the angle at which it is viewed, how it is lit and whether a light or dark background is being reflected in the metal. The darkest areas of the image are simply bare silver. He named it the "Daguerréotype", after himself.
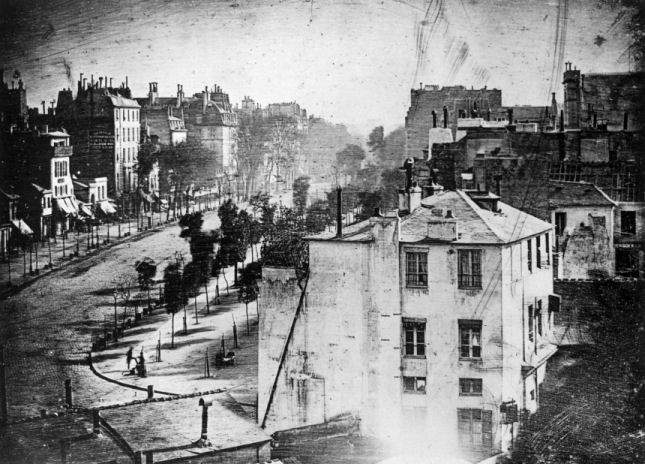
A Daguerréotype of Boulevard du Temple - the first photograph capturing a person - Louis Daguerre - 1838 (mirror image)
In parallel with Niépcé and Daguerre's experiments the previously mention William Henry Fox Talbot was also experimenting along these lines. Initially he was experimenting with a salted paper process that used writing paper bathed in a weak solution of ordinary table salt which was then dried and brushed on one side with a strong solution of silver nitrate, which created a light-sensitive silver emulsion that darkened when it was exposed to light. The treated paper could be placed in a small camera obscura that Fox Talbot christened his mousetraps and an exposure made. The image was formed during exposure and only required making permanent when the desired level of exposure had been achieved. The resulting image was tonally reversed and what is now known as a negative. This process was called "Photogenic Drawing". The next step in Fox Talbot's process was to reverse the tonal values of the negative which was accomplished by contact printing to produce a print known as a Calotype. The fibrous nature of the paper used did not provide the same degree of detail as the Daguerréotype but it was easier to view. Below is a photograph of the latticed window taken in 1835 at Fox Talbot's home at Laycock Abbey (now home to the Fox Talbot Museum) and is the oldest photograph in existence made from a photographic negative. Fox Talbot went on to publish a book of his photographic prints entitled "The Pencil of Nature".
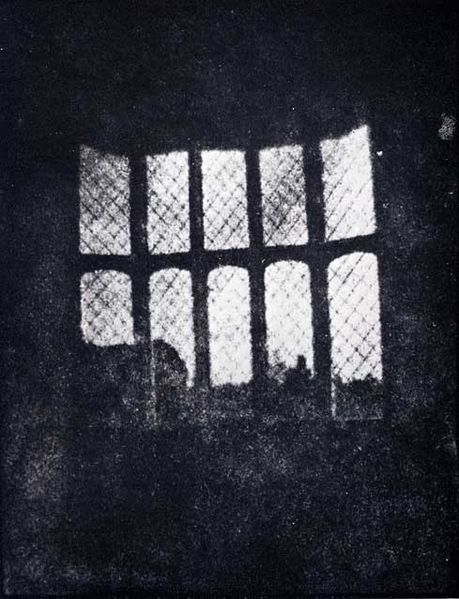
The Latticed Window at Laycock Abbey - the oldest photographic image made from a negative (Calotype) in existence - William Henry Fox-Talbot - 1835
Over the next twenty years the process was refined by Frederick Scott Archer. Archer spread a mixture of collodion (nitrated cotton dissolved in ether and alcohol) and silver nitrate onto sheets of glass. Like the Calotype; with the Wet Collodion process unlimited reproductions could be made from the original negative and the quality of the results exceeded that of the Calotype. The major drawback of this process was that if the sensitivity of the emulsion was to be preserved the exposure had to be made within fifteen minutes of the glass plates being coated. This necessitated a portable darkroom to be transported by the photographer for location photography. Also, the exposure was normally made onto a wet plate... hence the name Wet Collodion Process. The most famous portable darkroom was that used by the photographer Roger Fenton when photographing the Crimean War in 1855.
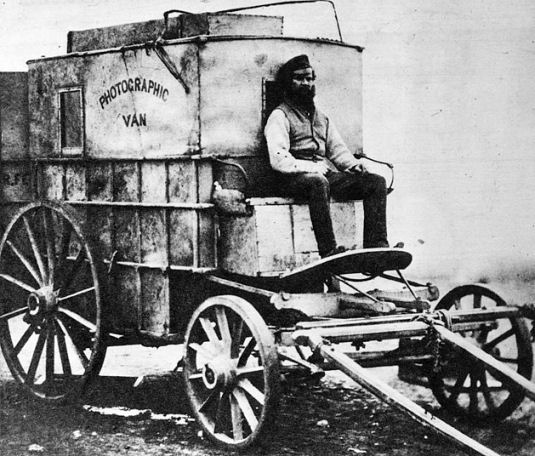
Crimean War photographer Roger Fenton's Photographic Van
In 1871 an English doctor by the name of Richard Leach Maddox invented a dry emulsion of gelatin and silver bromide on a glass platen subsequent years the photographic emulsion was created by using silver halide particles suspended in gelatin. With being a "dry" process (as far as exposure was concerned) this removed the need for a portable darkroom due to the plates being loaded into plate holders which could be pre-loaded with unexposed plates prior to travelling to a location. Once on location the plate holder was loaded into the camera once the desired composition was selected, the dark slide removed to allow the exposure to be made and then replaced and removed prior to the next photograph when the process was repeated. This process is still in use today by photographers using monorail and field cameras that are not fitted with digital imaging backs.
|
A Brief Photographic History Timeline |
|
| 400 BC | Discovery of the Camera Obscura by the Chinese philosopher Mozi |
| 1600 | Italian physicist and chemist Angelo Sala noticed the darkening of powdered silver nitrate when exposed to light |
| 1700 | Discovery of the Camera Lucida |
| 1800 | Thomas Wedgwood noticed that light had the ability to darken paper and leather treated with silver nitrate |
| 1826 | Nicéphore Niépcé the earliest surviving photographic image using Bitumen of Judea coated onto a copper plate |
| 1829 | Nicéphore Niépcé entered into a partnership with Louis Daguerre and developed what was to become the Daguerréotype |
| 1834 | William Henry Fox Talbot invented the negative/positive process and called it Photogenic Drawing |
| 1839 | John Herschel introduced hyposulphite of soda as a fixing agent to make silver based images permanent |
| 1841 | William Henry Fox Talbot improved on his negative/positive process and called it the Calotype |
| 1851 | Frederick Scott Archer refined the Calotype into the Wet Collodion process |
| 1855 | Roger Fenton photographed the Crimean War using his Photographic Van as a portable darkroom for coating Wet Collodion plates |
| 1861 | James Clerk Maxwell demonstrated the first projected additive colour image of a multi-coloured piece of ribbon |
| 1868 | Louis Ducos du Hauron patented various subtractive colour photographic theories |
| 1871 | Richard Leach Maddox invented an emulsion of gelatin and silver bromide on a glass plate |
| 1873 | Hermann Wilhelm Vogel discovered dye sensitisation, allowing photographic emulsions to be sensitive to green, yellow and red light |
| 1876 | Hurter and Driffield begin systematic evaluation of sensitivity of photographic emulsions for exposure calculation |
| 1878 | Edward Muybridge uses a row of cameras with trip-wires to make a high-speed photographic analysis of a galloping horse |
| 1887 | Introduction of celluloid as a base material for photographic plates and negatives |
| 1888 | First Kodak camera introduced |
| 1888 | Louis Le Prince makes Roundhay Garden Scene, believed to be the first motion picture film ever made |
| 1889 | The Eastman Company (later called Eastman Kodak) introduce the first commercially available transparent celluloid roll film |
| 1891 | William Kennedy Laurie Dickson develops the Kinetoscopic motion picture camera while working for Thomas Edison |
| 1895 | Auguste and Louis Lumière invent the cinématographe. |
| 1898 | Kodak introduces the Folding Pocket Kodak camera |
| 1900 | Kodak introduces their first "Brownie" camera |
| 1901 | Kodak introduces the 120 film format |
| 1907 | Autocolour becomes the first commercially available successful colour photographic process |
| 1908 | Leo, Audobard and Baradat produce the first 35mm still camera |
| 1913 | Oskar Barnack produces the first Leica camera |
| 1935 | Kodak introduces Kodachrome the first "Integral Tri-pack" colour film developed (sic) by Leopold Mannes and Leopold Godowsky |
| 1936 | Agfa introduces Agfacolor Neu... an Integral Tri-pack incorporating internal dye couplers |
| 1936 | Ihagee Exakta produce the first 35mm single lens reflex (SLR) camera |
| 1947 | Edwin Land announces the first Polaroid instant camera - the Type 95 which went on sale the following year |
| 1967 | First digital camera using a Charge Coupled Device (CCD - electronic image sensor) invented by Steven Sasson at Eastman Kodak |
| 1988 | Fuji announce the first consumer digital camera - the Fujix DS-1P resolving 0·4 megapixels |
| 1999 | Kyocera announce the first mobile phone to feature a built-in digital camera - the Kyocera VP 210 |
The be continued...
Click here to return to Contents
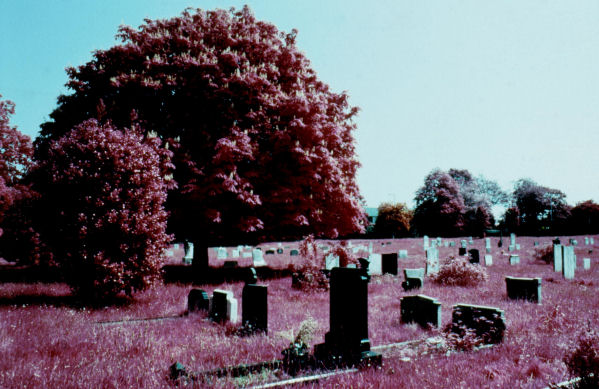
Since the dawn of photography there have been certain photographers that have stood out from the rest. If you were to ask the average photographer to list any of the classic photographers they would most probably struggle to mention more than a handful of contemporary photographers. I hope that this section of Photography in One encourages anyone interested in the subject to find out more about them. Below are a few of my favourite photographs taken by a selection of world-renowned photographers. It will be noticed that many contemporary photographers still prefer to use monochrome even though colour film (or digital imaging sensors) are available. In fact. Leica produce a digital camera, the "M Monochrom" that is incapable of taking colour photographs due to the sensor only being capable or taking monochrome images (mind you it does have a sensitivity of up to 25000 ISO!)
Fading Away - the first photo montage composite image (albumen print) from five negatives - Henry Peach-Robinson - 1858
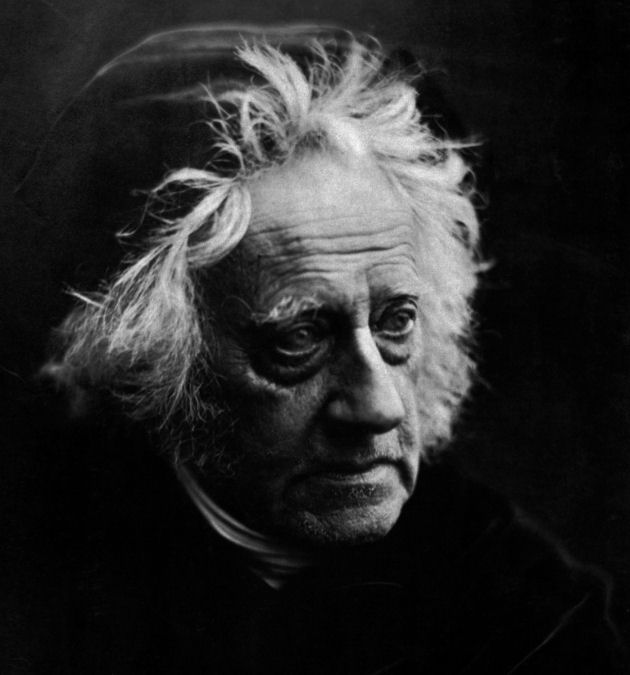
Sir John Herschel (albumen print from a wet collodion negative) - Julia Margaret Cameron - 1867
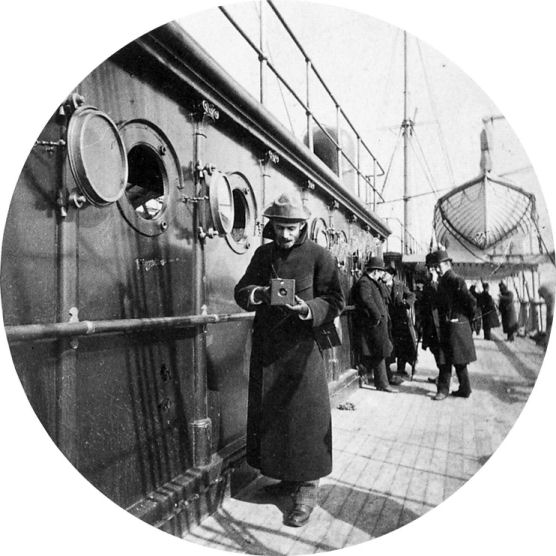
George Eastman and Kodak Brownie (taken on a Kodak Brownie) on board SS Gallia - Frederick Church - 1890
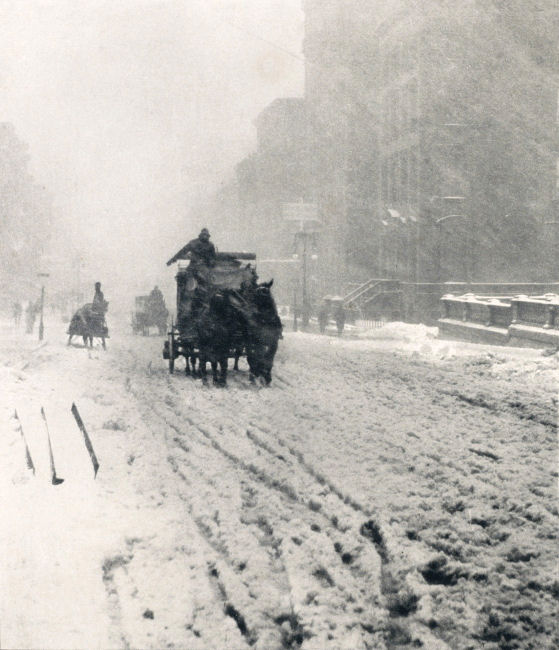
Winter, Fifth Avenue, New York - Alfred Stieglitz - 1893
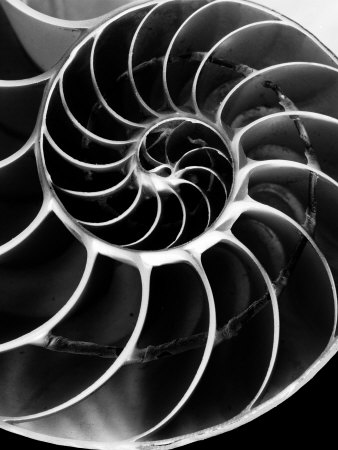
Nautilus Shell - Edward Weston - 1927

Brooklyn Bridge - Walker Evans - 1929
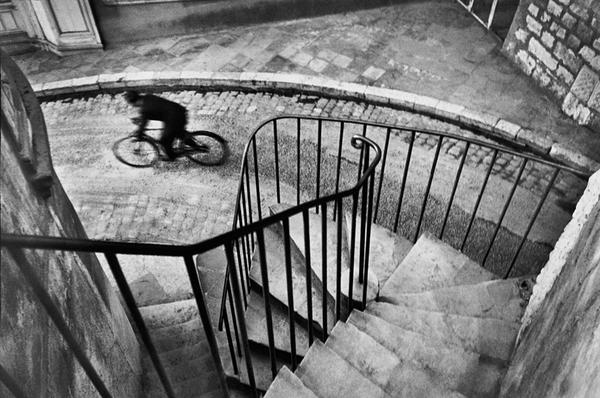
Boy on Bicycle - Henri Cartier-Bresson - 1932
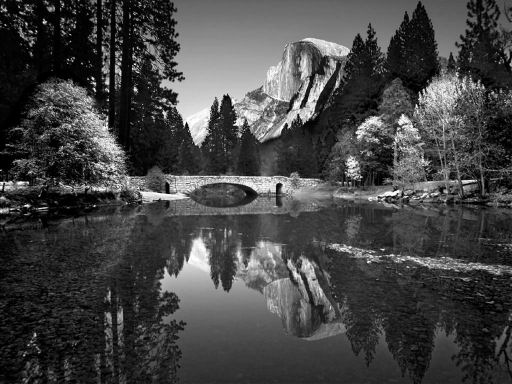
Mirror Lake, Yosemite National Park - Ansel Adams - 1935
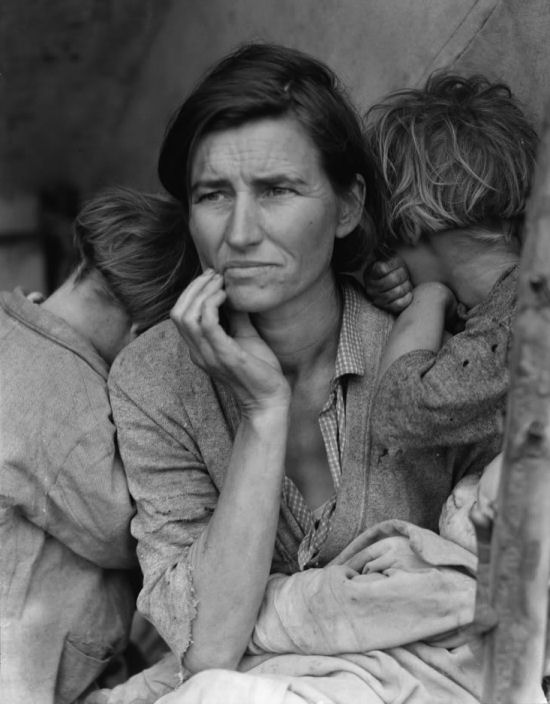
Migrant Mother - Dorothea Lange - 1936
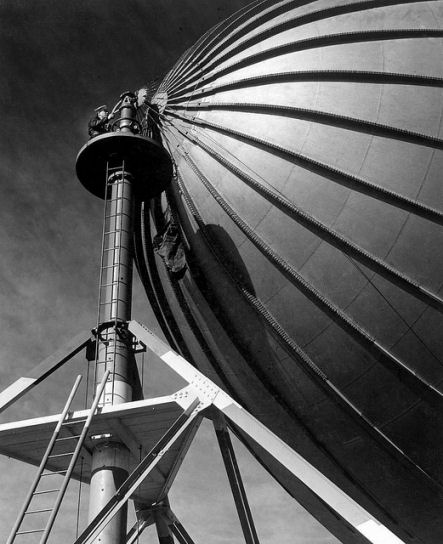
Airship Mooring - Edward Steichen - 1941

French Boy - Paul Strand - 1951
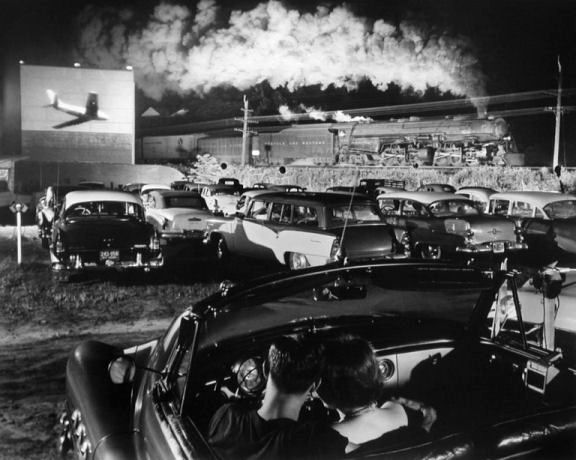
Hotshot, Eastbound at the Iaeger Drive-in - O Winston Link - 1956
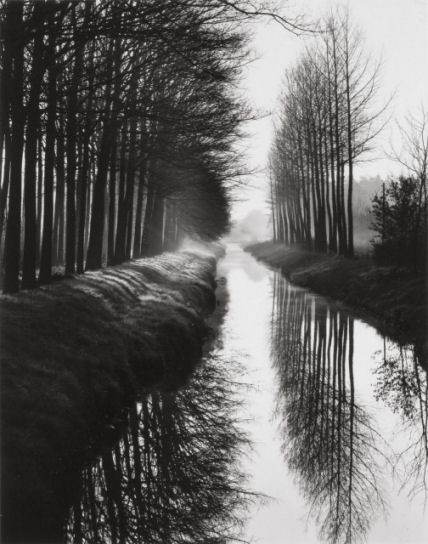
Dutch Canal - Brett Weston - 1971
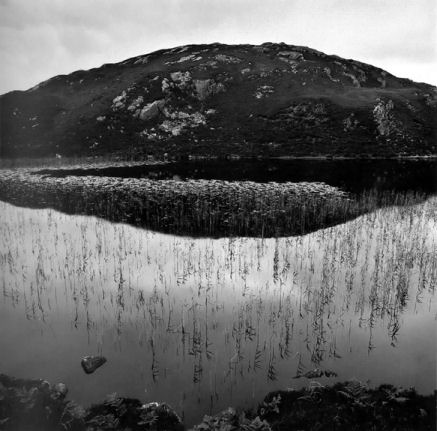
Reedy Loch - Fay Godwin - 1985
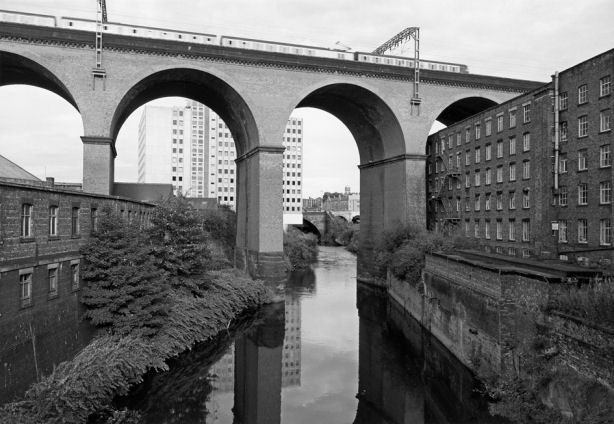
Stockport Viaduct - John Davies - 1986
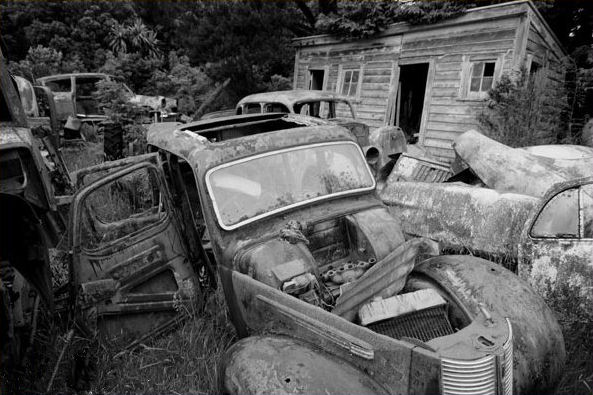
Scrap Yard - Wayne Mitchelson - 2008
Basic Photography Principles, Theory and Technique
As mentioned in the Introduction; photography has been with us for nearly two hundred years. Until recently, the image has been reliant on light sensitive precious metal elements (usually Silver Halide) coated onto a glass, celluloid or Mylar base and then chemically treated or developed to make the resulting image permanent. Because silver… the main light sensitive constituent of the photographic emulsion is a precious metal, photographic film has a tendency to be expensive. To off-set this expense, the silver is usually reclaimed by processing laboratories using fine filters to filter out the metallic particles from used developer solutions and sold back to the manufacturers to recycle and coat new film with. This practice kept costs down, but like everything else in the High Street, costs have a nasty habit of rising and, quite often, pricing the product off the market.
The same thing happened to ciné photography in the late seventies when it became too expensive for us lesser mortals to afford to pursue the subject. In came video photography. This seemed to be the answer to every ciné photographer’s prayer. The cameras were, understandably, expensive at first but running costs were considerably reduced. In 1980 a roll of Kodachrome 40 ciné film cost about £4 including processing which gave the photographer three and a half minutes of film. A videocassette cost about the same amount but gave up to four hours of recording time. Nobody cared that the image quality was inferior or that video was awkward to edit, the financial inducement and instant viewing feature was sufficient to ensure that video was a success once standardisation issues (V2000 versus Betamax versus VHS) had been finalised.
Initially, as with conventional film images, a reasonable level of light was required in order for the video image to be recorded. As time and technology waits for no man, this situation was soon to change. Today, video cameras have the ability to record images in “zero lux” or when little or no visible light is present. Some video cameras have the ability to capture infra-red images (in monochrome only at present) with an invisible light source. It will not be too long before these features spill over into digital still cameras, provided that they have not already done so.
But returning to still photography, cost is not the only drawback in silver-based photography. It lacks the ability to be viewed instantaneously after the image has been captured. “What about Polaroid”? I hear you ask. Well, with the best will in the world, Polaroid and other instant photographic image processes are not renowned for having the same resolution (the ability to capture fine detail) as conventional films. They also suffer from lack of “archival permanence” (the ability to retain a viewable image over a long period of time). This means that after say fifteen years, a Polaroid image will fade or become discoloured… even if stored correctly.
Archival Permanence
Mention was made in the previous section of archival permanence which is the ability to retain a viewable image over a long period of time. A conventional colour negative or print should be good for at least twenty-five years or longer, depending upon the way in which it is stored. A conventional black and white negative (not Ilford XP1 or XP2 images) or print will last upwards of one hundred years as it does not contain any coloured dyes that can fade in time. Digital images have the luxury of being viewed a fraction of a second after pressing the button. Points scored here then, but what about its ability for being stored for a long period of time? Well, more on that subject later on. In this instance, we could learn a lesson at the BBC’s expense. Many years ago, the BBC converted its film library to videotape. This seemed a good idea at the time, but what they did not foresee was the degradation of the recorded image known as "drop-out" (electronic fading). This lead to a frenzy of re-recording videotapes in a digital format onto black and white ciné film so as to obtain the maximum possible “archival permanence”. Unfortunately, the damage had already been done and many valuable recordings were lost for all time.
To put this into perspective, try playing an audiocassette that was recorded in the 1970’s or 1980’s. It will have suffered the ravages of time, displaying the previously mentioned “drop-out” which manifests itself in audio tapes as an occasional loss of volume, increased back ground hiss (even if Dolby or DBX noise reduction was used) and emulsion shedding onto the record/playback heads of the player. Such is the recording’s vulnerability to electro-magnetic fields. Computers once used floppy discs or Zip Drive discs to store photographic images. These drives use the same storage medium as videotape (Ferric Oxide coated onto thin Mylar discs instead of tape) so it can be appreciated that digital image storage could be a problem. In addition to this as digital camera resolution (and hence file sizes) have increased alternative storage of photographic files had to be sought.
One of the answers lay with the Compact Disc (CD) and Digital Versatile Disc (DVD) formats. When CD and DVD disc writers became more affordable and widely available, reasonably permanent storage came into everybody’s reach. The electronic storage of images in the shape of Flash memory on SD/XD Cards, memory sticks and pen drives offered another alternative. Their non-reliance on moving parts was a bonus as there was nothing mechanical to wear out except for the contacts that connect with the USB port and soon, with more and more cameras featuring built-in Wi-Fi for file transfer this will soon also be a thing of the past. The archival permanence of an image stored in such a device has yet to be ascertained, but we already know that electronic information stored in E-Proms (Erasable, Programmable, Read Only Memories)… the type of storage used for flash memory, can be affected by heat, infra-red and electro-magnetic radiation.
More and more equipment has the capability to communicate with other devices via Bluetooth, Near Field Communication (NFC), Wi-Fi and Cloud storage on the Internet. These have many benefits. Because the images are stored remotely from the camera in real-time, if the camera is lost, stolen, damaged or destroyed the images taken on them will have been stored safely. With the introduction of faster 4G mobile broadband speeds (and in the not too distant future 5G) this is the direction that I think that photographic image storage will go. Provided that there is not a catastrophe with the servers storing the image data this should ensure a high degree of archival permanence for future generations.
Resolution
If one takes notice of the manufacturers and the advertising media, the main criteria in assessing a digital camera seems to be its image resolution... the ability to record fine detail. At present, the state of the art in a professional digital camera’s CCD (Charge Coupled Device) or APS (Active Pixel Sensor) “Electronic Film” image sensor resolution is running at about 24 Megapixels (24,000,000 picture information elements). More often than not, a run of the mill amateur camera will resolve just over half that amount at 12 to 16 megapixels.
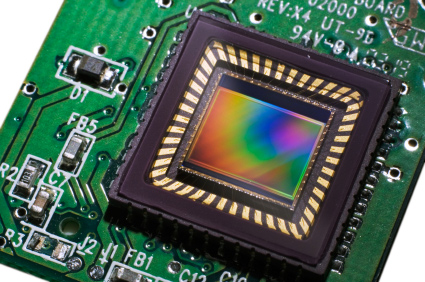
A typical digital image sensor
To put things in perspective, with a conventional 35mm camera, the type of film is what defines the resolution. Assuming a good quality 100/14 ISO film and an average resolution of 120 LPM (Lines per Millimetre) over the negative size of 24mm x 36 mm, this equates to 2880 pixels x 4320 pixels, giving an equivalent resolution of 12,441,600 pixels or just under 12·5 megapixels. Other types of film have lower and greater resolution. Kodachrome 25 transparency (slide) film is classed as a “slow” film, possessing a low sensitivity (speed) of 25/15 ISO and has a resolution equivalent to 20 megapixels. “Faster”, higher ISO speed films such as Kodak Tri-X rated at 400/27 ISO had a resolution of 3·6 megapixels. You have to admit… quite a difference. In photography you don’t get “out for nowt” and there is always a trade-off. In this instance resolution is traded off for speed. The photographer has to decide where their priorities lie. Is it with being able to capture a photograph in low light conditions without the use of a tripod or flash by using a “fast” film or does it lie in capturing an image that possesses the highest resolution available using a “slow” film?
In the realm of analogue photography this would mean choosing a film that possesses the characteristics required and once that film was in the camera (assuming non-interchangeable film backs) the choice was made. With digital cameras the internal image processor can change the image’s characteristics electronically. The camera's settings can alter the sensitivity, colour temperature and image type (monochrome/colour/infra-red/sepia/etc). This can be accomplished between photographs without effecting images previously taken. Alternatively, the settings can be over-ridden in some cameras by saving the image as a "Raw" file and altering the image in the computer using an image manipulation program such as Adobe Photoshop or similar.
Camera Types
Historically, cameras fell into various categories… the compact camera, rangefinder camera, the Single Lens Reflex camera (SLR), the Twin Lens Reflex (TLR) camera, the field camera (large format) and the monorail (large format) camera. Each had a specific market and was used to capture different types of photographic image.
The Compact or Rangefinder camera was usually 35mm (although medium format models have been produced) and ranged in size from a camera small enough to fit into a pocket or handbag and was used for taking family photographs or pictures where other types of camera would be intrusive or impractical due to their size.
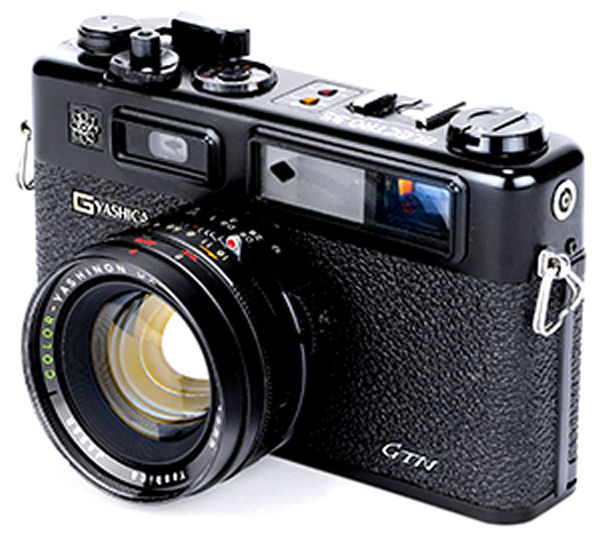
A typical 35mm rangefinder camera - the Yashica Electo35 GTN... one of the first cameras with an electronic shutter
With the SLR or Single Lens Reflex camera the photographer viewed the subject through the taking lens via a mirror and a prism adjacent to the eyepiece. The mirror would usually (but not always) flip up out of the way at the instant that the photograph was being taken. It might also feature interchangeable lenses to suit the type of photograph being taken. SLRs are also produced for medium format film, some of which feature interchangeable lenses, interchangeable backs for different film sizes as well as interchangeable viewfinders in some cases.
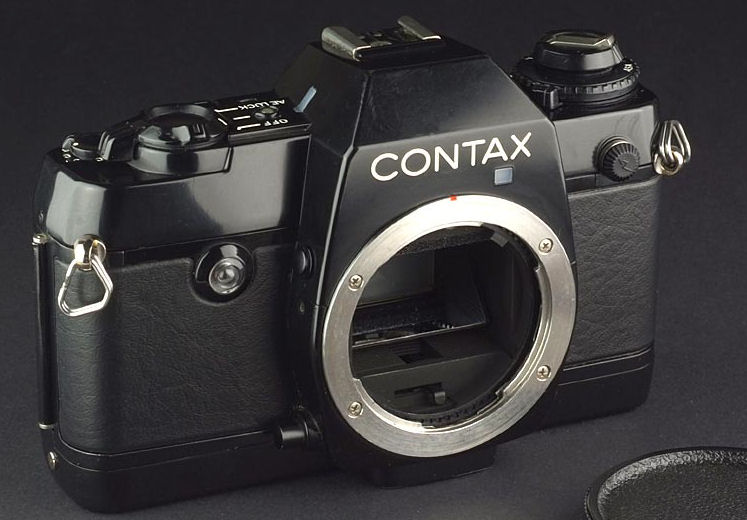
A beautiful Zeiss Contax 139 SLR body showing the lens mount
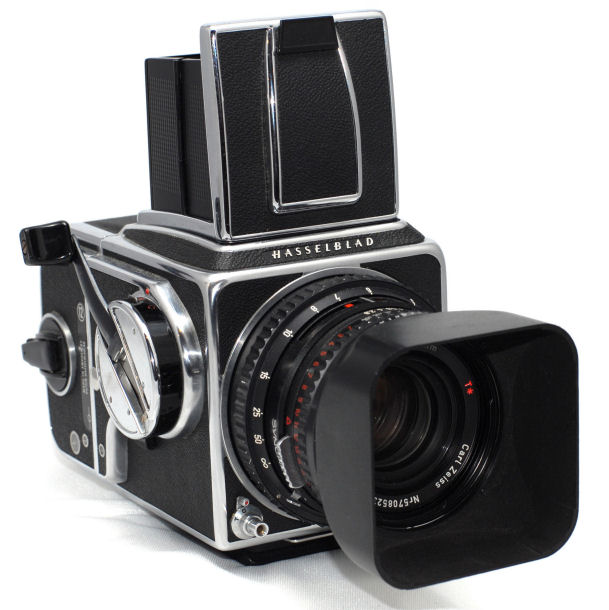
The Hasselblad 500CM is a 6 x 6 SLR that can accept 120/220/70mm film using interchangeable film backs
The TLR or Twin lens Reflex possesses two lenses adjacent to each other. One for viewing the subject and the other for the taking of the photograph. More at home in the studio they might also feature interchangeable lenses and more often than not would use 120/220 medium format roll film with image sizes (in centimetres) including 6 x 4·5, 6 x 6 and 6 x 7 and even 6 x 8.
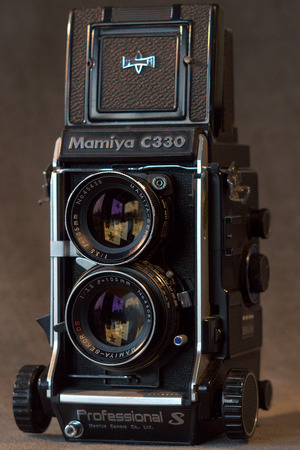
This Mamiya C330 Twin Lens Reflex camera features interchangeable lenses
Field and Monorail Cameras usually used large format or plate film where the ultimate in image quality was required. The field camera is more at home taking architectural or landscape photographs whereas the monorail was, like the TLR more at home in the studio for portraits or still life and advertising photographs. These cameras can also accept roll film and digital backs.
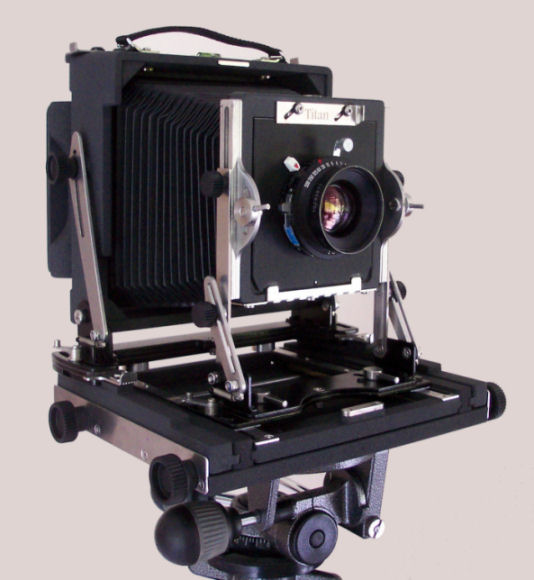
Walker Titan 5 x 4 field camera
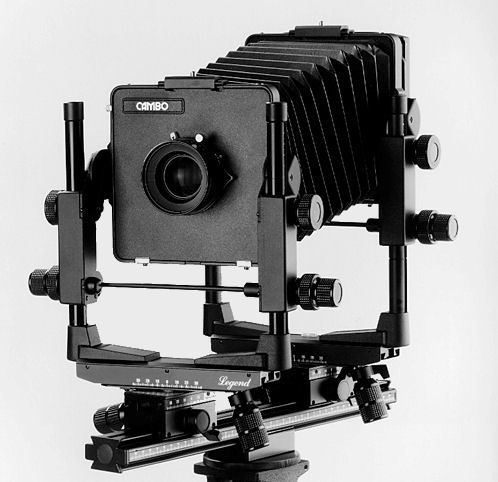
A Cambo Legend 5 x 4 monorail camera
There are other sub-categories of cameras but they usually fall into one of the types listed.
Digital cameras are usually either a Compact Camera, and SLR Camera or a Bridge Camera. The Bridge camera is a combination of the compact camera and the SLR camera featuring a fixed lens and an eye-level electronic viewfinder. As time has progressed compact cameras can now feature interchangeable lenses. This has caused the formation of a “sub-species” known as Compact System Cameras.
As with analogue cameras there are other types that are usually more at home in the studio and have large format sensors some of which are capable of resolving up to 160 megapixels without combining multiple images together.
There is no best type or make of camera. The best camera is the one that you have with you, does what you want it to do, provides images at the quality required at a price you can afford. It is easy to say that a Canon Eos or Nikon SLR is the best camera as far as the megapixel count is concerned but there are other criteria to be taken into consideration that affect image quality... lens quality and sensor size to name but two. Ultimately, the camera has to be easy to hold, not too bulky to carry and requires the minimum of extra equipment such as extra lenses, tripods, etc. to capture the desired photograph.
The choice of camera is up to the photographer but in my experience it is no good having a large camera that is too heavy and tiring to carry around and takes ages to set up. I have seen a landscape that I wanted to capture using a large format camera but by the time it was set-up the light has changed and the image I wanted to capture was not the same. Whereas with a more compact camera the photographer only has to lift the camera to the eye and press the button, ensuring that the image captured is the one the photographer wanted.
One of the biggest problems is trusting the technology. I always used to use a separate light meter to measure exposure. When I bought a Canon Eos 35mm SLR I still used the separate light meter until I discovered that the camera was making the same light measurement decisions as I was by using the separate meter. I then decided to trust the camera’s technology and relegate the separate meter to the cupboard. This was a giant leap of faith for a seasoned photographer that had used separate meters for nearly thirty years but it shaped the way that photographic technology was to go in the future.
Sensitivity
When taking photographs it is essential that the correct level of light reaches the camera whether it be analogue or digital. Correct exposure is a juggling act between sensitivity, aperture and shutter speed. Each of these criteria has an effect on the resulting image and to get the correct exposure these effects have to be prioritized in order to produce a photograph that exhibits the desired effect.
So that the photographer knows how sensitive a particular type of film is, the manufacturers have devised a set of standards to indicate the Sensitivity or Speed of the film’s emulsion. In the past there have been many standards to accomplish this, such as: Scheiner (one of the earliest scales) H & D (Hurter and Driffield), Weston/BS (Sangamo Weston/British Standards), GOST (Russian Standards Institute), ASA (American Standard Authority) and DIN. (Deutsches Institut für Normung). Today, the accepted standard is that laid down by the International Standards Organisation or ISO for short. The scales used are based on a combination of the ASA and DIN ratings. That is… if a film has an ASA of 125 it will have a DIN rating of 2l. If these ratings are converted to ISO their rating will be 125/21, which as previously mentioned, is a combination if both ASA and DIN ratings.
In the early days of photography, film emulsions were not as sensitive as they are today. This necessitated long (by today's standards) exposure times, and limited their use to studios and bright sunny days. These old emulsions are said to be “Slow” or “Low Speed” due to their inability to react to light. No doubt, the photographers of old would have marveled at the “Fast” or High Speed emulsions (and digital camera sensors) taken for granted by modern photographers.
But what do all these numbers and ratings really mean? If a photograph is to be taken in dim light or at night without flash, and a film of 125/21 ISO is to be used, there may not be enough light for the film to react. This would result in an under exposed or “thin” negative. What would be more suitable would be a faster film with a rating of 1000/31 IS0. Inversely, if photographs are to be taken on a bright sunny day and the same 1000/31 IS0 film is to be used, there would be too much light around, and the camera might not have a fast enough Shutter Speed or a small enough Aperture to be able to compensate, so producing over exposed or dense negatives. It was, therefore, essential to choose the right film for the lighting conditions likely to be encountered. Modern day digital photographers do not have to worry about having the correct film at hand due to their cameras possessing the ability to change the sensor’s sensitivity (ISO setting) at the push of a button. Generally, this can range from 80/20 ISO to 128000/52 ISO although Canon have produced a sensor rated at 4,000,000/67 ISO.
It is easier to explain how film sensitivity works by relating it to analogue (or wet, silver-based) photography. In a fast film the silver halide particles are larger than in a medium or slow speed film. With the silver particles being larger there is a greater chance that they will be hit by photons of light and therefore capture an image. The only problem is that with the particles being larger they are more likely to be seen by the naked eye on the resulting print. This is known as “grain” and has been a drawback to taking low-light photographs without an external means of illumination such as a flash unit or flood lights. With the particles being larger there will be less of them within a given area therefore resolution will be less than with a slower film.
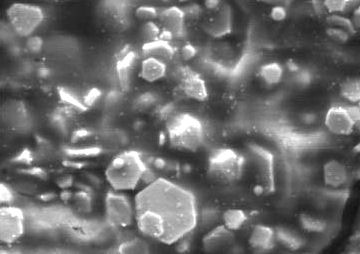
A photomicrograph of a "fast" emulsion showing large sliver halide particles
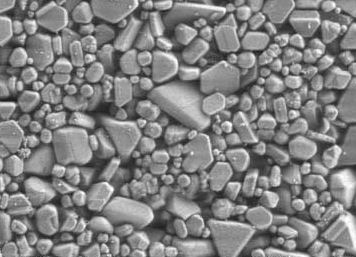
A photomicrograph of a "slow" emulsion showing a greater number of smaller sliver halide particles
A “slow” speed film will record a superior, more detailed image with no noticeable grain provided that there is sufficient light for it to react to. The opposite of the “fast” film, the “slow” film possesses silver halide particles that are smaller making them less noticeable. The down-side is that by being smaller they are less likely to be hit by photons during a certain length of time, hence they require a longer exposure time or wider lens aperture. Slow speed films are usually used in the studio with electronic flash or flood lights or, if being used outdoors when there is sufficient ambient light such as on a really bright, sunny day. On the plus side with there being a greater number of smaller particles with a given area the resolution will be higher.
With digital cameras the same rules apply (for different reasons) only the photographer has the luxury of being able to alter the sensitivity of the sensor at the push of a button without having to change the type of film loaded in the camera. This is something that traditional photographers could only have dreamt about in the past... such is the march of technology! Digital cameras exhibit a "digital noise" when the sensitivity is increased. This is the digital camera equivalent to grain. The images are also prone to magenta fringing at high-contrast tonal boundaries.
Film Types
There are four main types of film. Each type has a specific role to play in photography. The types are as follows:
Monochrome Negative. Historically speaking, this was the first type of photographic emulsion in general use. It produces a black and white negative from which prints may be made. The slowest film in this type in general use is a tie between Agfapan 25 and Kodak Technical Pan. Both have an ISO rating of 25/15. One of the latest films of this type is also the fastest film in general use of any type. This is Kodak T.Max P3200. Its nominal rating is IS0 3200/36, but may be rated at up to 50,000/48 ISO with modified (pushed) processing. An average speed film in this type would have been 125/22 not so long ago, but with the advent of Tabular Grain technology, this has risen to 400/27 ISO A good example of which is FujiFilm Neopan 400. An "oddball" in this group was Ilford XP1 and XP2. Although a black and white negative film, it was processed in C41 colour negative chemistry. It is capable of extremely good results, can be rated at anything from 50/18 ISO to 400/27 ISO and maintained the same processing time, such was the Exposure Latitude of this film. With modified development time it could even be rated as high as 6400/39 ISO.
Colour Negative. The name of this type of film is a misnomer as there is no such thing as a colour film, they are all black and white films chemically dyed. As its name suggests, this type of film enabled the photographer to produce colour negatives from which colour prints may be obtained. All films of this type are processed in C41 chemistry like Ilford XP2 was. The slowest film of this type was Kodak Ektar 25 rated at 25/15 ISO and was the Finest Grain colour negative film available. Due to its slow speed, it did not have a great deal of exposure latitude. Its use was usually only recommended for pictorial uses or when extremely big enlargements were to be made from a negative. The fastest film in this group was Fujifilm Fujicolor HR 3200 and was rated at 3200/36 ISO An average speed film was Fujicolor Fujicolor HR200 which was rated at 200/24 ISO.
Colour Transparency or as it is more generally known Colour Slide (a term that goes back to the time of the Magic Lantern) film was the first type of genuine colour films. The film produces slides that may be Mounted in a cardboard or plastic frame known as a slide mount and shown on a screen using a Slide Projector. The quality of images from this type of film is exceptionally good in both Resolution (the ability of a film to reproduce fine detail) and Colour Fidelity (the closeness to the original colour as seen by the Human Eye). This is due mainly to the film in the camera being the same piece of film that is projected onto the screen with minimal interference in between. The price paid for this is that the film has very little exposure latitude and exposure has to be within 1/3 of a stop. The slowest film in this group is Kodachrome 25. This is arguably the finest colour film ever made, but it was expensive and required special processing unlike most other slide films that were processed in E6 chemistry. For the fastest film in this group we look again to FujiFilm who produced Fujichrome 1600. With Push Processing (prolonging the First Developer time) this film can be rated at 3200/36 ISO. An average speed of slide film would be FujiFilm’s Fujichrome 100 RDP2 which had reasonable latitude for a film in this type, fine grain and good colour fidelity.
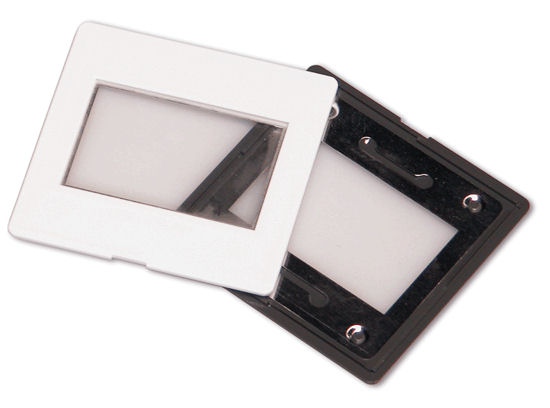
GePe glassed 35mm slide mounts
Prints could be obtained from slides, but the results were rarely as good as those made from negatives. The prints were obtained in two different ways. The first way is the Internegative Print. This required a negative to be produced from slide and a print made from it. The colours of the resulting print were seldom as accurate as the original and Resolution (image sharpness) was lost. The second type was the Direct Reversal Print. Quite often this was referred to (sometimes inaccurately so) as a Cibachrome print. This type of print is obtained directly from the slide and the quality is usually extremely good, but image contrast can be high, detracting from the image. Special paper and reversal processing was required for this type of print, but with care an advanced amateur could produce extremely good results in a home darkroom.
Specialist Films form the fourth group of films. They can be used to produce Internegatives for making prints from slides, Vericolor Slide Film for producing slides from negatives, Agfa Dia Direct, (now replaced by Agfa Scala at 200/24 I.S.O.) which produced black and white slides (see below) and various black and white films with high contrast or limited Spectral Sensitivity (the ability to react to various colours). Both Ilford and Kodak produce Infra-Red films sensitive to the Infra-Red end of the colour spectrum. These films are available in both monochrome and colour. They required care with loading, exposure and processing and had limited uses but experimenting with this type of film produced unusual results especially with pictorial subjects and landscapes.
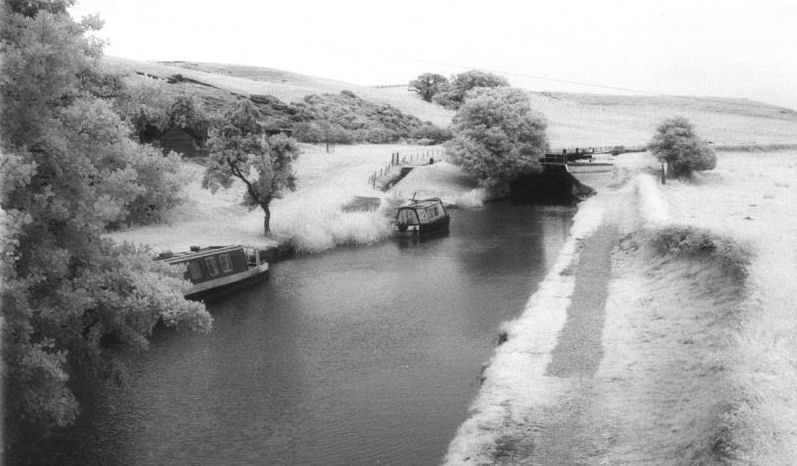
An example of a monochrome infra-red photograph...
...and a colour infra-red photograph
Exposure Control
Let us revert to analogue (wet) photography for a while as it is easier to explain some of the photographic theories surrounding exposure control than its electronic counterpart. When a film is exposed in a camera, a certain amount of light has to reach the film in order that it is termed Correctly Exposed. Too much light and the resulting negative will be too Dense for the light in the enlarger, slide projector or scanner to penetrate, this is known as Over Exposure. Too little light and the negative will be too clear or Thin, and the detail of the image will be lost. This is known as Under Exposure.
Different types of film will require more or less light than others. For example, one type of film will require a lot of light in order to record all the subject information and produce a correctly exposed negative, whilst another type of an will not require as much light in order to produce a negative of similar density.
Once the correct film has been chosen, how is the actual amount of light present measured in order to obtain the correct Shutter Speed and Aperture settings on the camera?
The piece of equipment once used to measure light is called a Light or Exposure Meter and came in many shapes and sizes (and prices). At the height of the popularity of 35mm photography most cameras had built in light meters, as did some Medium Format (that accept 120/220/70mm size film) cameras also have them built in, but the Large Format cameras (that accept sheet film) relied on the hand held light meter.
Cameras that have built in light meters fell into three categories, Fully Automatic, Semi-Automatic and Manual. With fully automatic cameras, the built in meter will set both the aperture and shutter speed using a pre-determined algorithm commonly known as a Program. The values of the working aperture and shutter speed are altered simultaneously as the ambient light levels increase or decrease.
The Semi-Automatic camera will require the Aperture (Aperture Priority) or the Shutter Speed (in Shutter Speed Priority) to be pre-set and the camera calculates the relevant alterations needed, usually indicating the settings in the Viewfinder by means of a Swinging Needle or Electronic Display
The Manual camera has a light meter that indicates whether the settings are correct or not, leaving the alteration of shutter speeds or apertures to the photographer. Usually, there is some form of coupling from the lens to the camera body, historically a mechanical coupling mechanism, but latterly, a set of electrical contacts transmit the lens aperture information the light meter.
The Multi-Mode camera is usually an SLR type camera that incorporates most, if not all of the other exposure modes (Aperture and Shutter Priority, Programmed and Manual). Leaving the photographer to decide which exposure mode is best suited to the conditions in which photographs are being taken.
Most modern cameras set the ISO automatically by reading a barcode pattern on the side of the film cassette. This is known as DX Coding. On older cameras the ISO was set manually using a dial usually on the camera's top plate. This has been the cause of many a ruined film when the photographer has forgotten to reset the dial when the film being used had a different rating to the previous one.
There are two types of meter configuration used in cameras. One type has the light meter cell on the front of the camera and reads an average brightness of the scene being photographed. This type of meter is quite primitive and open to inaccuracies due to not “seeing” exactly what the camera’s lens sees.
The second type of meter is usually associated with SLR (Single Lens Reflex) type cameras, (where the subject is viewed through the taking lens rather than a separate viewfinder). With this type of camera, the light meter "sees" exactly what will be transmitted to the film as the light meter cell is usually in the camera’s pentaprism or incorporated into the instant return mirror. Accordingly, it is inherently more accurate.
Some cameras have the ability to take Spot, Centre-Weighted, or Partial light readings of the subject, and so, give an accurate light reading of a particular part of the subject. Others may have taken an average of what the lens sees and can give an inaccurate reading when the subject has a high Subject Contrast Ratio. For example, with a boat floating on water, the light meter would see the large expanse of water, which is highly reflective, and be tricked into thinking that the lighting conditions are brighter than they actually are. It would, based on this inaccurate reading, expose for the water, which would render the boat Underexposed as it is darker than the water.
Modern digital cameras have the ability to change the type of exposure reading as well as back-light control for high contrast subjects. The Subject Contrast Ratio can be viewed by selecting the Histogram setting on the camera. Here the contrast ratio as displayed as a graph. In a perfectly exposed photograph the Histogram should possess a flat plateau across most of the display.
Some more sophisticated 35mm cameras measure the amount of light actually being reflected off the film when the camera's shutter is open during exposure. This system is capable of giving highly accurate automatic exposures and is known as Off the Film Plane Metering. This type of meter was also used in many professional cameras for Flash Metering, that is, measuring the intensity of an on-camera electronic flash unit's output during exposure and trimming the flash unit’s output in real-time to maintain correct exposure. This is how digital cameras measure exposure both for ambient light and for flash photography.
The later type of Multi-Mode Autofocus cameras used a different approach to exposure metering. The sensors that assess the focus information are also used for exposure measurement. Any number of sensors between six and sixteen were used. The sensors divided the viewed image into segments, the number of which depends upon the number of sensors in the camera. A light reading is taken from each sensor and is converted into a digital computer code. The computer code is then compared with one of approximately twelve thousand readings stored in the camera's computer memory. When an identical code is found, it is passed to a buffer amplifier which takes into account the film sensitivity, the exposure mode the camera is set to, which way up the camera is being held (by using a mercury switch), which lens or zoom focal length is set (so as to minimize Camera Shake) and other considerations as well. This multitude of information helps the camera to make extremely accurate exposure readings and was known as Matrix or Multi-Pattern metering. Camera Manufacturer Olympus marketed a few SLR camera models (OM3, OM3ti, OM4 and OM4ti) that incorporated a similar system in which the photographer determined which zones were read.
Hand Held light meters measure the light in two different ways. The most common way is the Reflected light reading. Here the meter measures the amount of light being reflected off the subject and is quite accurate in most lighting situations provided that it is used correctly. The second type of reading is the Incidental light reading. This type of reading measures the amount of light falling onto the subject and is a lot more accurate in ambiguous lighting situations like the boat on the water mentioned previously. This is because it does not differentiate between the light and the dark parts of the subject, measuring only the light falling onto the subject and can, therefore, give a more accurate light reading. This type of reading is well suited to transparency film with its limited exposure latitude and where exposures cannot be corrected in the enlarger when prints are being made. When using the Incidental light reading method a translucent cone (Invercone) is fitted over the sensor and the meter pointed towards the light source… usually the sun.
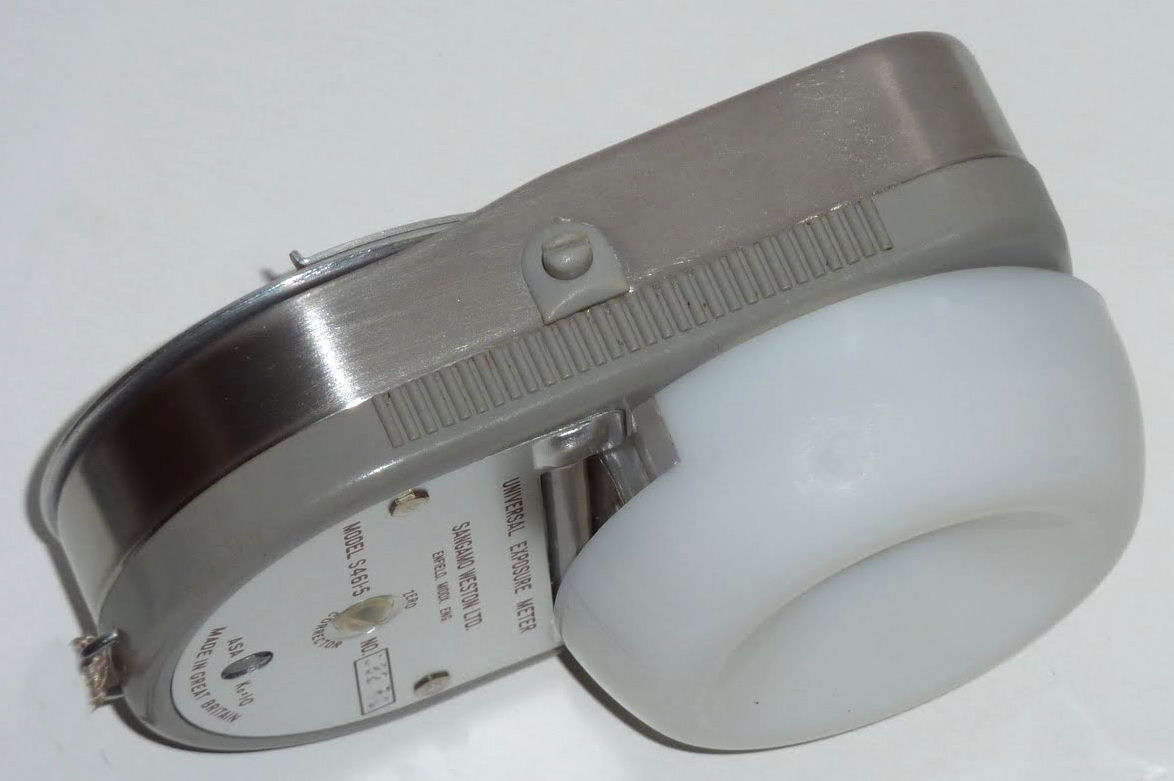
A Weston Euromaster fitted with an Invercone for measuring incidental light
Some photographers favored the Duplex method where a reflected light reading was taken, an Incidental reading was taken… and the camera set to the difference between the two. Landscape photographer Ansel Adams took light readings to the extreme by devising the Zone System where the subject was divided into seven zones, the exposure prioritized as to where the most information was contained and film development modified accordingly.
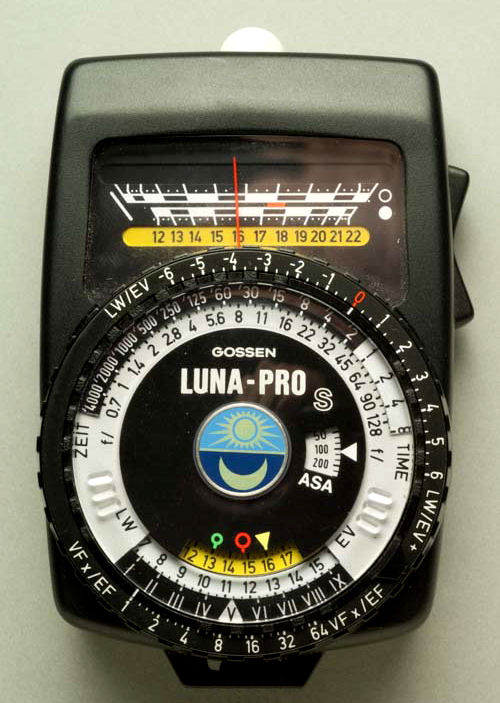
Gossen Luna-Pro S hand held analogue light meter
Another type of light meter is the Flash Meter. This unit is used to measure the light produced by flash units and is dealt with in the notes dedicated to flash photography.

A modern Gossen Luna-Star F2 digital flash meter
Inexpensive Snap Shot and Disposable cameras did not have a light meter built-in. Also, they did not have adjustable apertures or shutter speeds. If this is the case, how do they achieve correct exposure? The answer to this is quite simple... they don't. They have a fixed aperture of around f11 and a fixed shutter speed of about 1/125 of a second. This will give an average exposure in most lighting situations with adequate depth of field. In some lighting conditions, the resulting negatives will be either over or under exposed. When the negative is printed, an under exposed negative (which will be Thin) is compensated for by a short exposure tune in the enlarger. Inversely, an over exposed negative (which will be Dense) will be compensated for by a long exposure time in the enlarger. This system uses the inherent Exposure Latitude of the film, processing and printing to achieve correct exposure. The results can be acceptable provided the photographer views the end product within the limitations of the equipment. These limitations include loss of shadow detail or information in darker parts of the subject and, inversely, high light or the brighter detail in the subject will be lost. The focus range or depth of field will also be limited from about three metres to infinity. Optical quality from cameras of this type is usually very limited.
Aperture and Depth of Field
Imagine the Aperture of a lens as being a water pipe. The greater the diameter, the greater the amount of water that can pass through it. The smaller the diameter, the smaller the amount of water that can pass through it. The aperture in the lens works the same way, but instead of water being passed through it, light is. As the hole or aperture size increases, more light can pass through. As the hole or aperture decreases, less light can pass through. The end result being that the varying intensities of light found in different weather or lighting conditions can be accommodated. When used in conjunction with different shutter speeds, correct exposure can be achieved for films of different sensitivities or ISO ratings.
The size of the hole is calibrated in “F” Numbers. The largest hole or aperture having the lowest number, e.g. f1.4. The largest hole or lowest number is also known as the Speed of the lens, or the maximum amount of light it is capable of passing. Some lenses are said to be faster than others because they have a lower f number and therefore pass more light. For example, a lens with a maximum aperture of fl.4 will pass more light than a lens with a maximum aperture of f2. In fact, the fl.4 lens will pass twice as much light than the f2 lens. The maximum aperture of the lens is also reflected in the price, but not necessarily in the quality of the lens. It is quite normal to pay 25% more for a lens with a maximum aperture of fl .7 as against a lens that only goes down to f2. In the same way, an f1.4 lens would cost more than an fi .7 lens. This is because the faster lens would have more pieces of glass or Elements in it, and more care, time and effort would have to be exercised in design and assembly.
As the lens aperture is closed or Stopped Down, click stops are usually encountered at pre-determined points. These click stops are usually numbered as follows:- fl.4, f2, f2.8, f4, f5.6, f8, f11, f16 and f22. Some lenses, especially those used on large format cameras may even stop down as far as f32, f45 or even f64. On some cameras, it is possible to look through the lens while the apertures are being altered. It will be observed that as the aperture is altered from the lowest number to the highest, the image grows darker. In fact, when the lens is altered from, say, f8 to f11, the amount of light passing through the lens is halved.
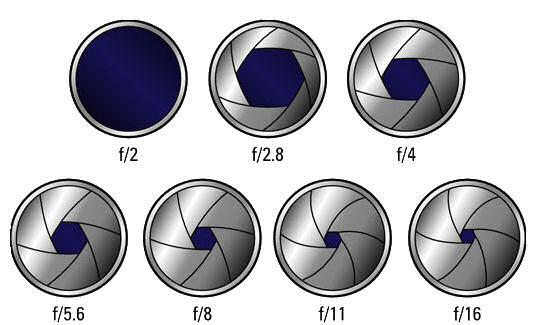
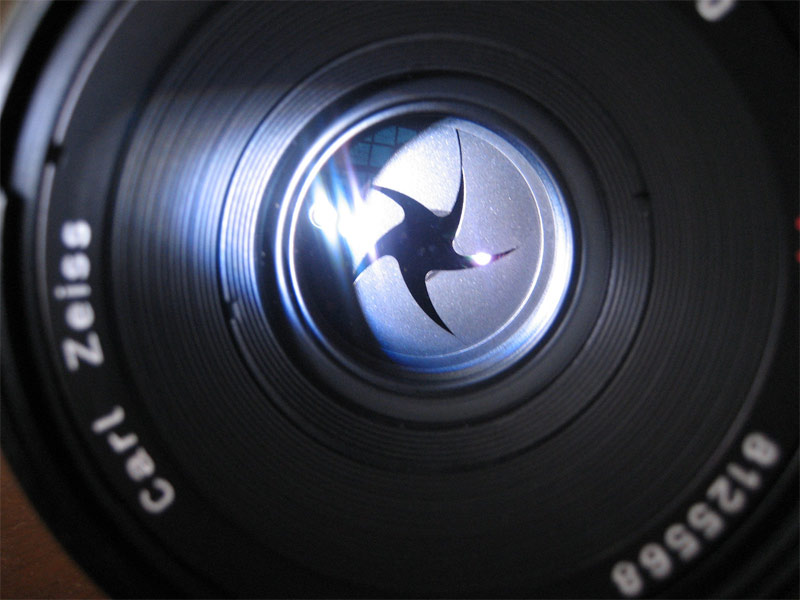
Lens apertures at various settings
With modern digital and Single Lens Reflex cameras, the image is viewed through the lens at maximum aperture. When the shutter is fired, the lens will stop down to the selected aperture for the duration of the exposure, after which it returns to maximum aperture. This is to allow the maximum viewfinder brightness and to minimize depth of field and facilitate accurate focusing of the image to be photographed. Older cameras required the photographer to stop the lens down manually prior to exposure (Pre-set Diaphragm or PSD), but modern cameras fulfill this function automatically either by mechanical or electrical linkages (Fully Automatic Diaphragm or FAD). As well as regulating the amount of light passing through the lens the aperture or diaphragm has a second function. This is to regulate the Depth of Field. This is the amount of the subject that is in focus at a particular “f” number. At f22 there will be a great amount of the subject in focus whereas at f2 there will be less of the subject in focus as is demonstrated in the chart below.
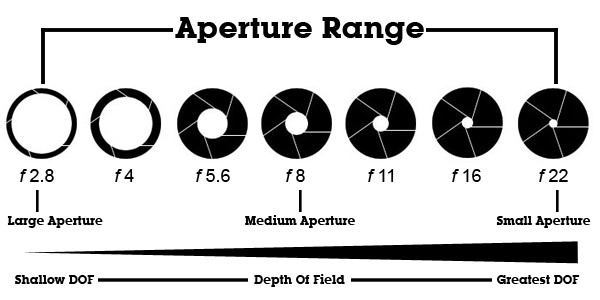
If a landscape is to be photographed then the maximum amount of the subject will be needed to be in focus from the part of the photograph nearest to the camera (foreground) to the part of the photograph furthest from the camera (usually infinity). This is called Depth of Field. Therefore, a small aperture such as f16 or f22 will be required to ensure the maximum Depth of Field is recorded on the photograph.
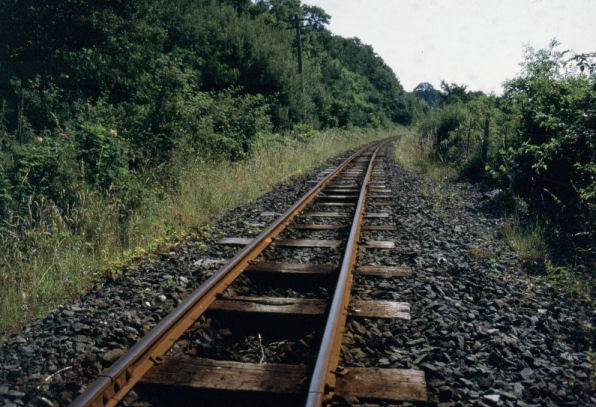
A small aperture of f22 gives a depth of focus to the landscape
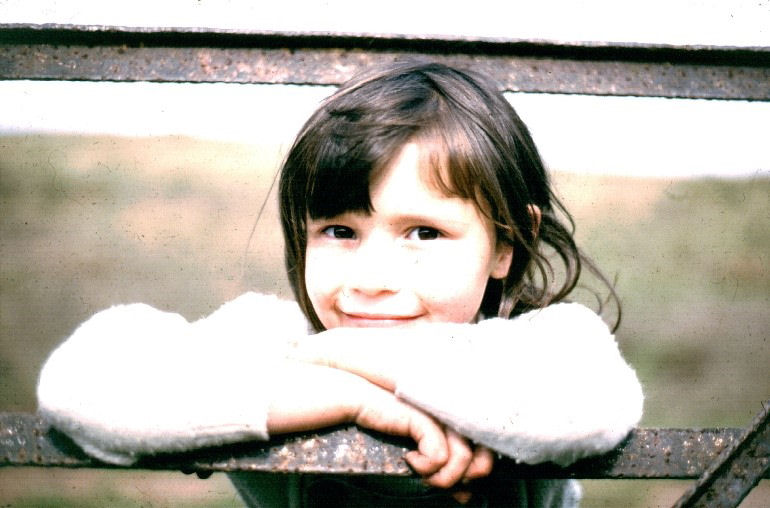
Inversely, if a portrait of a person is being taken and the foreground/background is required to be out of focus to concentrate interest on the subject then a large aperture such as f2·8 or less will be required. This is known as Selective Focus or Shallow Depth of Field or to use modern terminology... the Bokeh Effect which is the points of light in the photograph (usually in the background) that are out of focus.

In this portrait the background is out of focus (shallow depth of field) by using a large aperture of f2·8 and illustrates the Bokeh effect
Shutter Speeds, Types and Freezing Action
The Shutter in a camera is like a door, opening and closing to expose the film or image sensor to light. There are two basic types of shutter, the Focal Plane Shutter which is located adjacent to the film or image sensor shutter and the Leaf Shutter, usually located between the glass elements in the camera's lens.
The focal plane shutter consists of blinds made from light proof cloth or very thin metal foil or lightweight metal blades that traverse across the film or sensor either horizontally or vertically. The blinds or blades travel one after the other separated by a slit of adjustable size. The size of the slit effectively controls the time that the film or sensor is exposed for.
The horizontal focal plane shutter trailing cloth curtain can be seen in this photograph
For instance, in a horizontally running shutter, the slit may be set so that the second blind does not start to traverse the film plane until the first blind has completed its opening movement. This might give an exposure time of 1/60th second. But if the second blind starts to close when the first blind is only half way across the film plane, then the film will only have been exposed for half the previous time and give a shutter speed equivalent to 1/125th second. Therefore, the shutter speed has been effectively halved. If; however, a time delay is introduced so that the second blind does not start to close until the first blind has been open for twice as long, then the shutter speed doubled giving a speed of 1/3Oth second.
The timing of the blinds is usually arranged so that the film is exposed for time periods varying between I second and 1/1000th second in steps of half (or double) the previous time. For instance… 1 sec, 1/2 sec, 1/4 sec, 1/8th sec, 1/15th sec, l/3Oth sec, 1/60th sec, 1/125th sec, 1/250th sec, 1/500th sec, 1/1000th sec. Some shutters may have faster speeds reaching 1/4000th or even 1/8000th of a second. Inversely, the slowest shutter speed may be as low as 10 seconds with a mechanical shutter or even 1 minute with an electronic shutter or digital camera.
This camera has a vertical running metal bladed focal plane shutter
In the past, shutters were timed mechanically by clockwork, but today, most of the timing is achieved electronically. The camera will incorporate a microprocessor linked to a quartz controlled timer. As well as providing the camera with greater accuracy, it can link in to automatic exposure circuits more easily and accurately than a mechanical shutter can.
The second type of shutter is the Leaf or Compur type shutter. The light controlling leaves or blades are situated between or just after the lens elements and controls the light as it passes through the lens. It operates in much the same way as the aperture, except that the blades close fully to block off the light completely and open up fully to allow the maximum amount of light to pass through. Timing is accomplished in much the same way as the focal plane shutter, either mechanically or electronically. Certain types of shutter blades also act as an aperture by opening to various amounts and in doing so negate the need for the aperture. These shutters are not widely used due to the increased complexity of the unit.
The partially open blades in this Compur-type shutter can easily be seen
One of the main advantages of the leaf shutter is only apparent when taking flash photographs. With the focal plane shutter, flash photographs can only be taken successfully at a certain shutter speed. Depending on the type (horizontal or vertical, blades or blinds), the whole of the film will only be exposed at a particular speed such as 1/60 second for a horizontally running blind or 1/125 second for a vertically running bladed shutter. The leaf shutter, however, allows any speed to be used due to the leaves opening fully for a timed period before closing. This has obvious advantages for press or studio photographers when photographs are frequently taken using a mixture of light sources like ambient sunlight and flash. In these circumstances, the aperture and shutter speeds have to be juggled to allow both light sources to register on the image being photographed..
The focal plane shutter is usually found in SLR cameras and the leaf shutter in digital, compacts, twin lens reflex medium format and large format Field or Monorail cameras. This is not an exclusive rule as there are compact Rangefinder cameras (e.g. Leica and Contax) that have a focal plane shutter and SLR cameras that have complicated shutters that incorporate both focal plane and leaf shutters (e.g. Contaflex and Hasselblad). Unfortunately, as well as being very expensive, this type of design is not noted for its reliability due to the fact that they also require an additional shutter to provide additional light sealing facilities.
Focal plane shutters are normally preferred for SLR cameras due to the ease of which interchangeable lens facilities can be incorporated and because of the need to have an unrestricted view through the lens for the reflex viewfinder.
As well as controlling the amount of time the film is exposed for, the shutter can have the effect of freezing action. For instance, if a photograph is to be taken of a racing car being driven at speed, a fast shutter speed would have to be used in order to freeze the action. If too slow a shutter speed was used, then the subject would appear blurred due to the distance it travelled whilst the shutter was open. When a faster shutter speed is used, the subject would have travelled a shorter distance whilst the shutter was open and therefore, reduce the blurring.

In this photograph a high shutter speed has frozen movement
When a fast shutter speed is used, the aperture will have to be opened wider to maintain correct exposure. For example, the light meter indicates that correct exposure would be 1/60th second @ f8. The shutter speed would be too slow to freeze the action of a speeding car, so a shutter speed of l/lOOOth second would be preferred. If this speed was used without altering the aperture, the resulting photograph would be underexposed. For every shutter speed increment above 1/60th second the aperture would have to be opened up by one stop, thus… l/125 @ f5.6; l/250 @ f4 I/500 @ f2.8, and accordingly, 1/1000 @ f2.
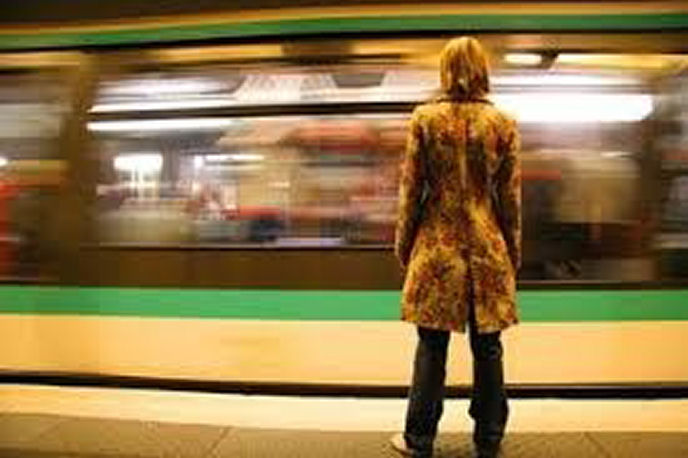
In this photograph the moving part of the subject is blurred due to using a slow shutter speed
This would capture the action and be correctly exposed. Similarly, if a photograph that required maximum depth of field was to be taken, then the shutter speed would have to be increased until correct exposure was achieved. For instance, to give the required depth of field, an aperture of f16 was to be used, and the light meter indicates correct exposure would be l/60 @ f8, then the progression would be as follows:- !/60 @ f8; l/30 @ f11; l/15 @ f16. The only difficulty to arise in these circumstances is that at speeds below 1/30th second with a standard lens on a 35mm camera, it is difficult to hold the camera steady enough to prevent Camera Shake. In this instance, the answer would be to use a tripod, flash unit or a faster film.
Composition
The basic rules of composition fall into two categories… Landscape and Portrait. This is to do with the orientation of the camera or by cropping the photograph accordingly.
If the photographer is taking a photograph of a landscape then the camera is normally held in the conventional manner which is known as Landscape format. The shape of the film or camera sensor matches that of the view to be captured.
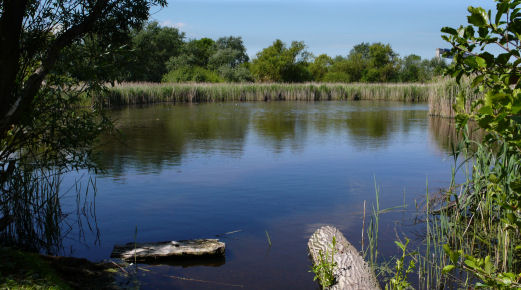
This photograph is taken in the conventional Landscape format
If, for example a person or part of a person is to be photographed, who has a naturally vertical format then the camera would have to be rotated 90° to match the format of the subject. This is known as Portrait format.

This photograph was taken in the Portrait format
But there are always exceptions to the rule. For example if a waterfall that has a natural vertical format is to be photographed then the camera would have to be rotated 90° to match the format of the subject.
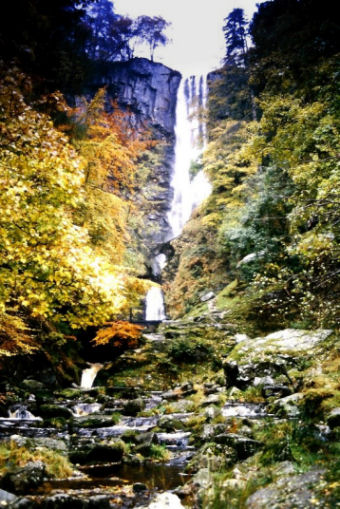
A Landscape photographed in the Portrait format
Also, sometimes when photographing a person the camera has to be used in the Landscape format, especially if the person is sitting or just a head and shoulders shot is required.
A Portrait taken in the Landscape format
Generally, if the camera is to be used in the Portrait format it is rotated 90° clockwise. This would ensure that the camera is well supported with the shutter release lower-most and when the shutter release is being pressed there is less chance of camera shake due to the way that the camera is supported.
Click here to return to Contents
If you would like to know more about my personal photographic history and see some examples of my photographs follow the link below...
and...
![]()
Click here to return to Contents
or click on the required section below to follow links to various subjects
|
Contents Click here for the latest Canalscape entries or on the required section in the Contents below to follow links |
|
| Forward | |
|
|
Introduction |
|
|
|
|
|
|
|
|
|
|
|
|
|
|
|
|
|
|
|
|
Book 7 - 2011 |
|
|
|
|
|
|
|
|
Book 10 - 2014 |
|
|
Book 11 - 2015 |
|
|
|
| Ruby | |
| nb Squirrel | |
| Canals on Screen | |
| Canalscape & Diarama Photography | |
| The Manchester and Salford Junction Canal | |
| Mersey Connections | |
| Canis Canalus | |
| Shannon | |
| Lymm Cruising Club Website | |
| Site Map | |
| Go to the | |
|
|
|
| Website | |
![]()
| Introduction |
| Diarama Photography |
| Wyre Heal - Wirral's Local History |
| Wheels and Props |
| Audio and Hi-Fi |
| Transporter Bridges |
| Half Term Adventure |
| Footnote and About the Author |
|
|
|
|
"Canalscape" and "Diarama" names and logo are copyright
Up-dated 14-04-2016